This tutorial explains the procedures for those developing apps that use the Epson Connect API, from registering with Epson Connect to printing in apps that use the Epson Connect API. Follow the steps below to get ready and make the most of the Epson Connect API to expand the functionality of your app.


The Epson Connect API complies with OAuth2.0 (RFC 6749).
This tutorial requires a basic understanding of OAuth2.0.
To use the API, you need to register with Epson Connect. First, register your printer or scanner with Epson Connect. From this page select your sales area to check if your device supports the Epson Connect API.
・If your model name is listed in the list of compatible models, follow the steps below to register with Epson Connect.
・If you have already registered, please proceed to 2. Registering with the Epson Connect API site.
Please choose your preferred method below and follow the instructions to register.
・Registering a Printer from Your Printer Panel
・Registering a Printer from Your Computer
・Registering a Printer from Your Smartphone or Tablet
・Registering a Dedicated Scanner
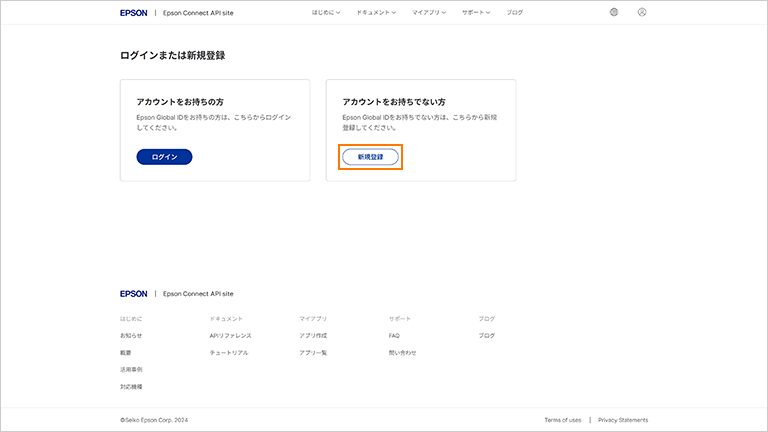
To use the Epson Connect API, you must register an Epson Global ID. Go to this page and complete your account registration.
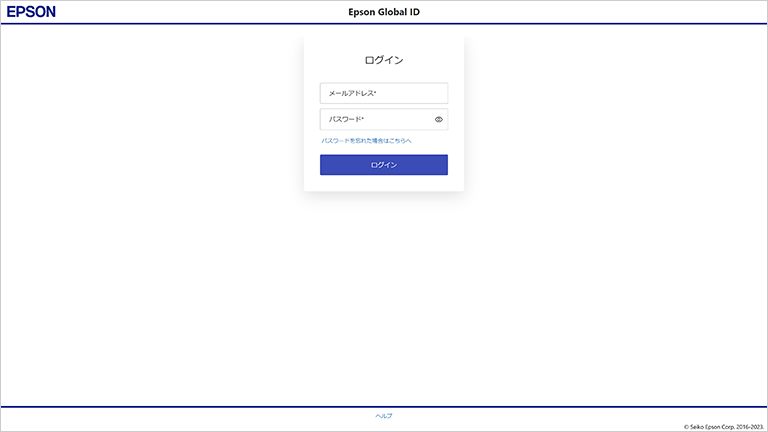
Click the Login button.
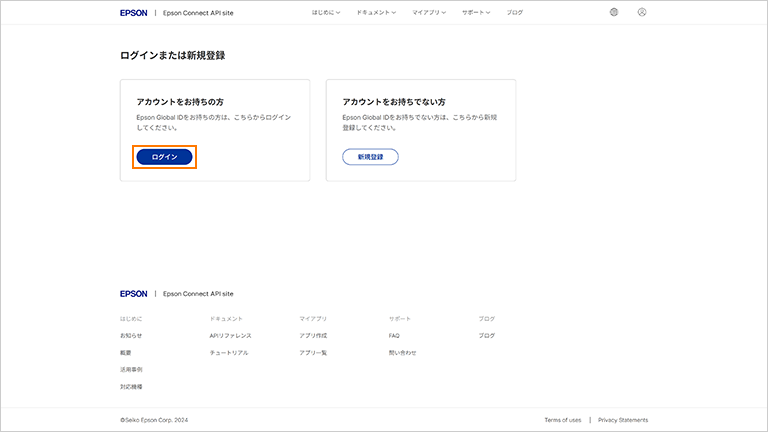
Enter your email address and password and click the Login button.

When you click the Login button, the two-step authentication screen will appear.
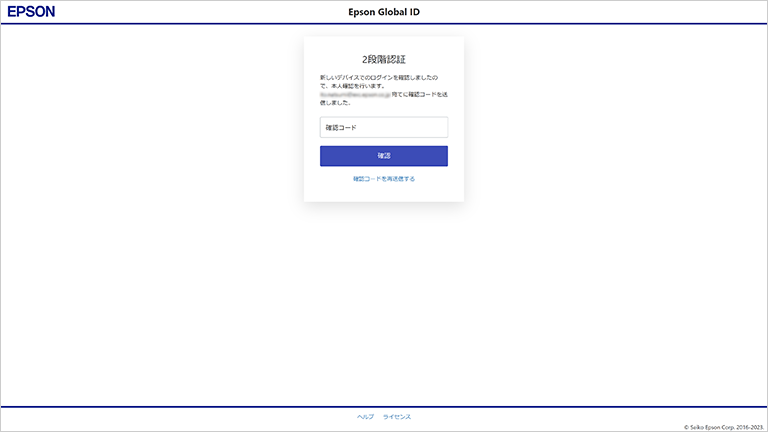
A confirmation code will be sent to the email address you entered on the login screen.
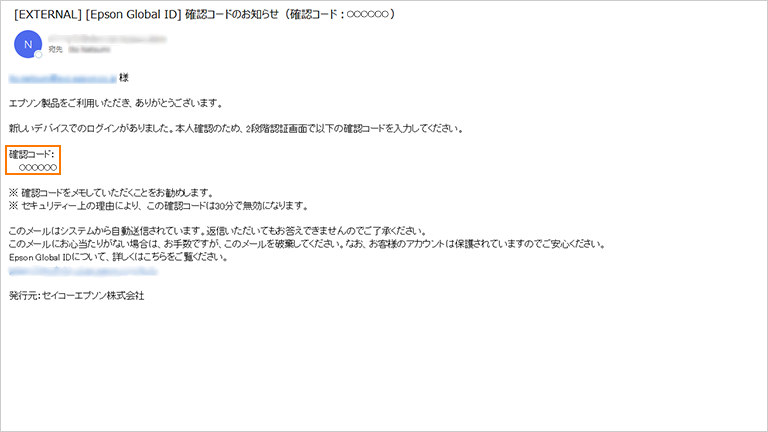
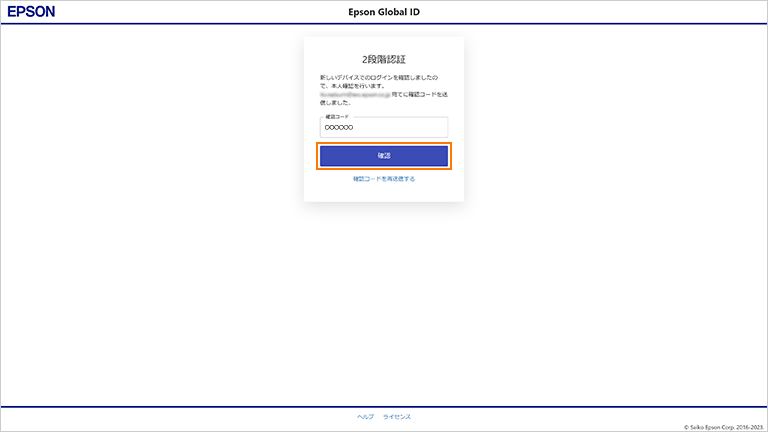
Please enter the verification code in the email into the two-step verification screen and click the Verify button.
Once you have logged in, the Epson Connect API site will be displayed.

The registration on the Epson Connect API site is complete. Proceed to 3. App Creation.
Click the Sign Up button.
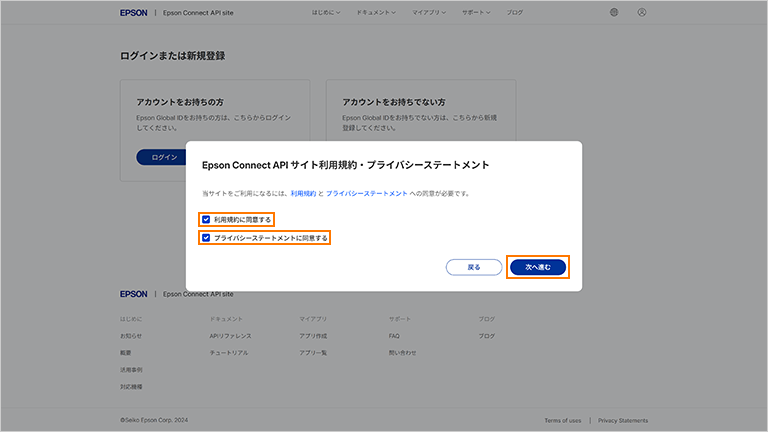
Please check the terms of use and privacy statement, and if you agree, click the Next button.
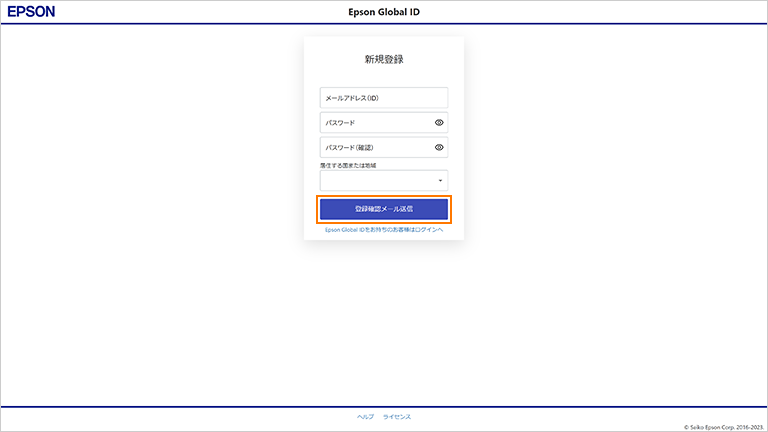
The new Epson Global ID registration screen will be displayed. Fill in each item and click the Send Registration Confirmation Email button.
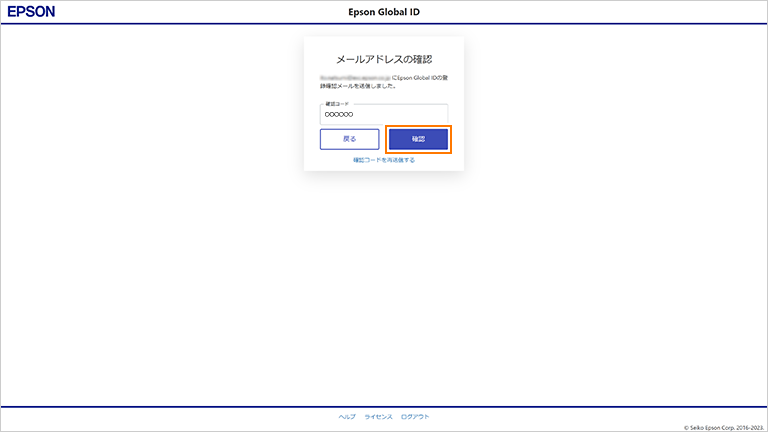
The email address confirmation screen will be displayed.
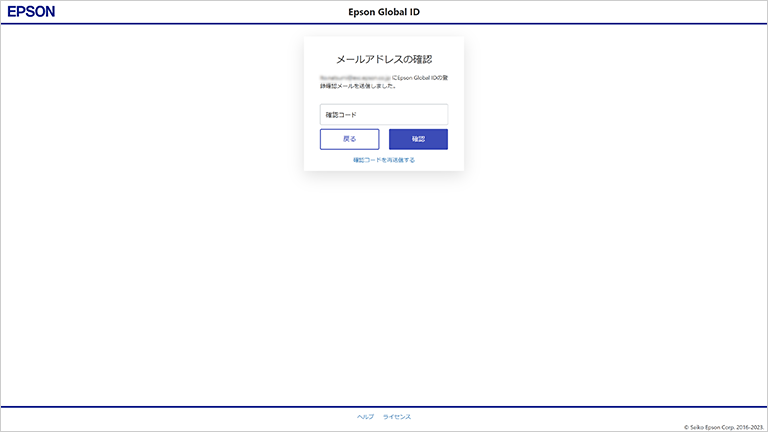
A registration confirmation email will be sent to the email address you entered on the registration screen.
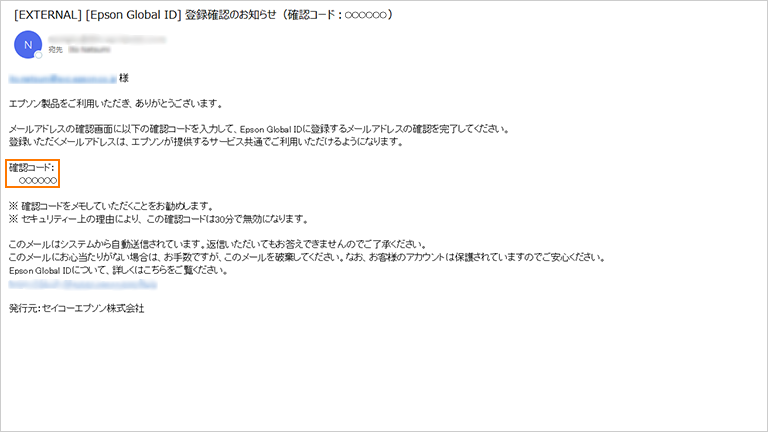
Please enter the verification code in the email body into the email address verification screen and click the Verify button.
Once registration is complete, the Epson Connect API site will be displayed.

The registration on the Epson Connect API site is complete. Proceed to 3. App Creation.
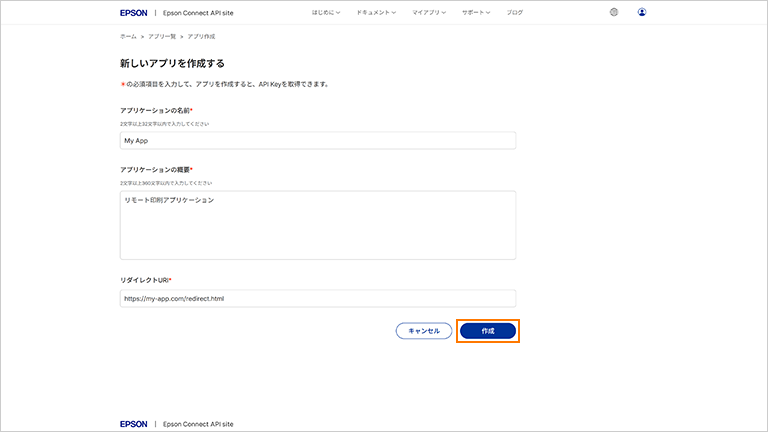
Log in to the Epson Connect API site and register your app on this page. By registering your app, you can obtain the authentication information (API Key, Client ID, Client Secret) required to call the API.
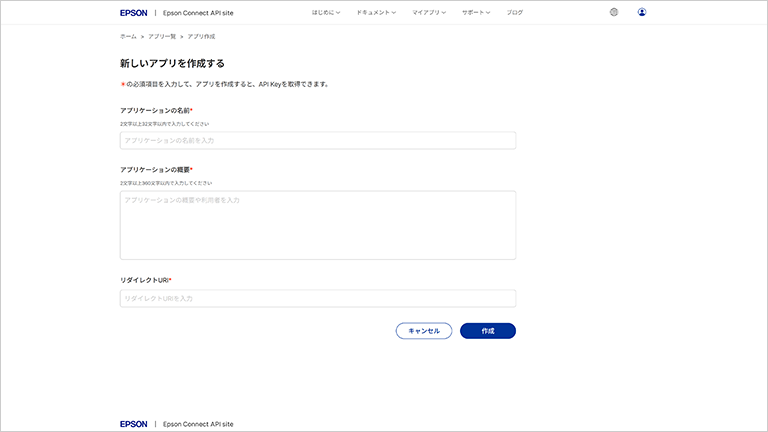
Please enter each item as follows.

Application Name: Enter the name of the app that will be integrated with the API.
Application Overview: Please describe how the app will be used and how it will interact with the API.
Redirect URI: Device authentication complies with the OAuth 2.0 specification. Please specify the URI to redirect to after executing the Authorization Endpoint.
Once you have entered the above information, press the Create button.
Your app will be created and your API Key, Client ID and Client Secret will be displayed.
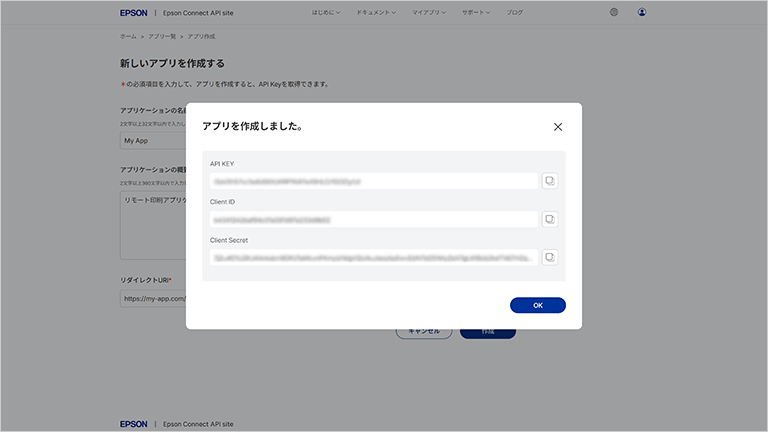
The displayed API Key, Client ID, and Client Secret are the authentication information required when implementing the program.
Please keep this information in a safe place so that you do not give it to others or lose it.
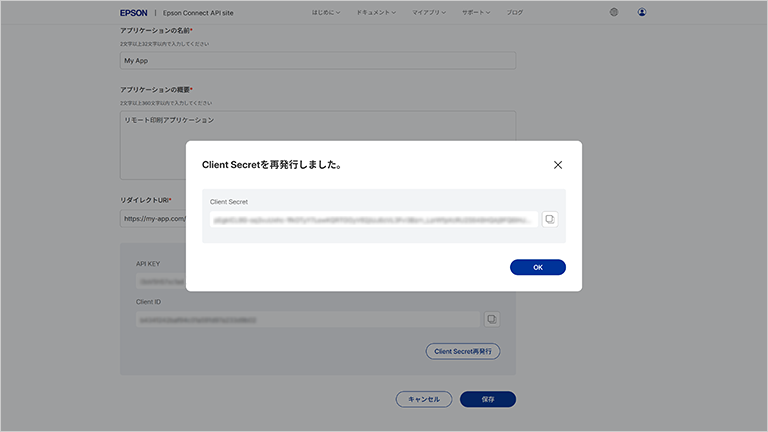
You can check the API Key and Client ID again on the app editing screen, but the Client Secret will not be displayed again.
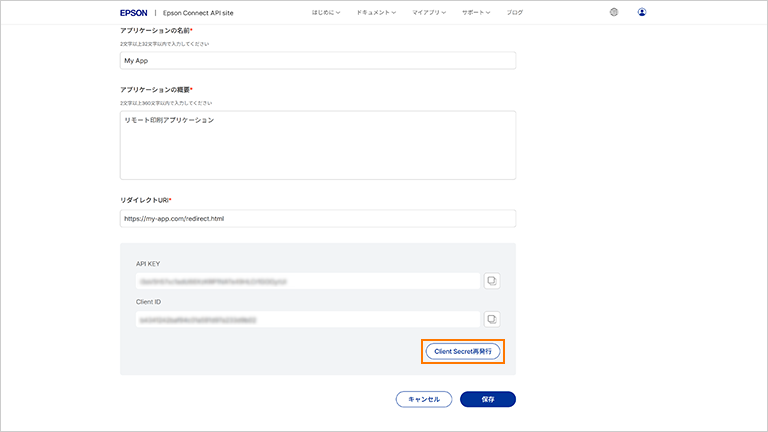
If you lose your Client Secret, you can retrieve it again by clicking the Reissue Client Secret button on the app editing screen.
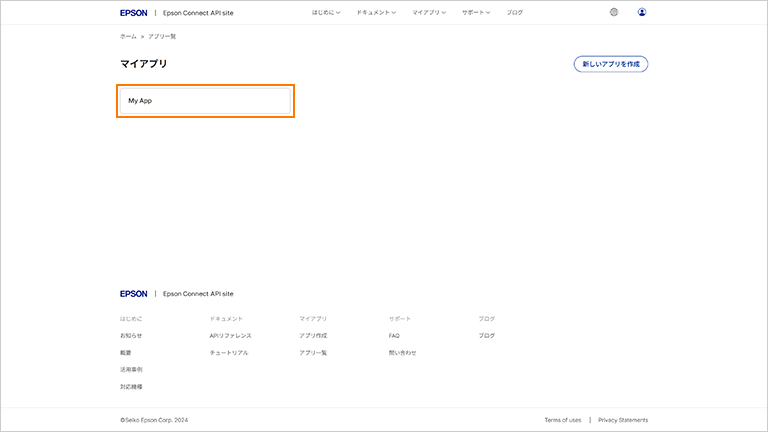
From the list of apps, click the app for which you want to reissue the Client Secret.
Click the Reissue Client Secret button at the bottom of the screen.
A confirmation dialog will appear. Click the OK button if you wish to proceed.
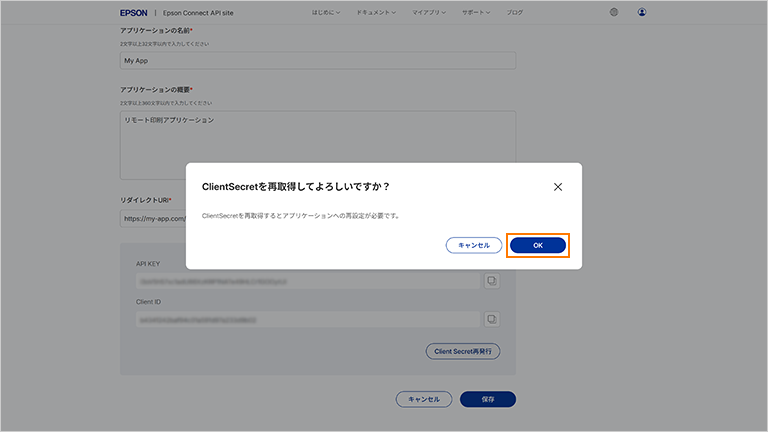
The Client Secret will be reissued.
From here on, we will explain how to write a program to incorporate into the app to use the API. Before starting to implement the program, let's understand the authentication format.
This is an authentication procedure that complies with the OAuth2.0 Authorization Code Flow and is required when your app accesses the user's printers or scanners via API. If authentication is successful, a device token is issued. Details are provided in 4. 1. Device Authentication.
This is an authentication procedure that conforms to the OAuth2.0 Client Credentials Flow and is required when your app uses an API. If authentication is successful, an app token will be issued. This applies to APIs that do not include access to printers or scanners. Details are provided in 4. 2. App Authentication.
Authentication Format |
Implemented APIs |
|---|---|
Device Authentication |
Get Device Information |
Printing ability acquisition |
|
Get default print settings |
|
Print job creation |
|
Print Job Duplicate |
|
Print execution |
|
Cancel printing |
|
Get print job information |
|
Get list of scheduled print jobs |
|
Schedule print job creation |
|
Scheduled print job duplication |
|
Schedule print job reservation |
|
Delete scheduled print job |
|
Get scheduled print job information |
|
Get list of scan destinations |
|
Scan destination registration |
|
Scan destination update |
|
Delete scan destination |
|
App Authentication |
Notification information acquisition |
Notification information settings |
Epson Connect API has implemented a new security mechanism to prevent access to printers and scanners without the owner's permission. First, understand how this mechanism works and then implement it in your app.
First, you need to have the user set up your app so that it can use the API for the printers and scanners they own. Place the following link in your app to direct users to it.
https://auth.epsonconnect.com/auth/authorize?response_type=code&client_id={client_id}&redirect_uri={redirect_uri}&scope=device
*client_id: Enter the Client ID issued in 3. App Creation.
redirect_uri: Enter the URI you entered in the redirect URI field in3. App Creation.
When a user clicks this link, the Epson Connect login screen will open, where the user can enter their ID and password to log in to Epson Connect.

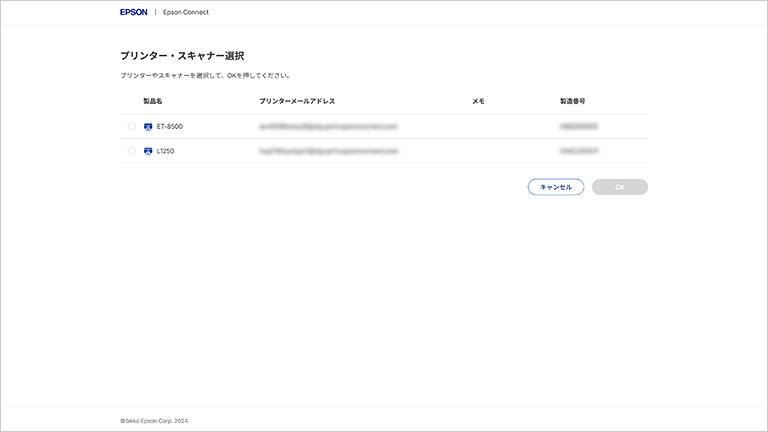
Once the login is successful, a list of Epson Connect registered devices associated with the user will be displayed. Have the user select the printer or scanner they would like to link with your app from the list of devices.
Once this is complete, you will be redirected to the redirect URI registered in 3. App Creation, and you will be able to receive the authorization code required for the API call from the URL parameter (code).
GET
http://<my-app.example.com>/redirect?code={authorizatioin_code}&iss=https%3A%2F%2Fwww.epsonconnect.comUse this to call the token endpoint and obtain the refresh token and device token as follows.
POST
https://auth.epsonconnect.com/auth/tokenHeader Name |
value |
|---|---|
Authorization |
Basic |
Content-Type |
application/x-www-form-urlencoded |
grant_type=authorization_code&code={authorizatioin_code}&redirect_uri={redirect_uri}&client_id={client_id}{
"access_token": "U2e5jzamUswohttKRVnbqv2IVFvDMB2R9c-JJ-sxgf0",
"refresh_token": "B3QRR2D-Dfvm30ntuuaBZq6SRreNON0JkA07V-YIwvs",
"scope": "device",
"token_type": "Bearer",
"expires_in": 3600
}By entering the acquired device token as shown below, you will be able to call APIs that require access to the device.
Here we will try calling the "Device Information Acquisition API".
The device token will expire after 1 hour (3600 seconds) and will no longer be usable. In that case, call the token endpoint with the refresh token to obtain a new device token.
GET
https://api.epsonconnect.com/api/2/printing/devices/infoHeader Name |
value |
|---|---|
Authorization |
Bearer format device token |
x-api-key |
API key issued by 3. App Creation |
none{
"productName": "value",
"serialNumber": "value",
"connected": true
}If the device token expires, you can use the refresh token to obtain a new device token.
POST
https://auth.epsonconnect.com/auth/tokenHeader Name |
value |
|---|---|
Authorization |
Basic format authentication information (Client ID: Client secret) |
Content-Type |
application/x-www-form-urlencoded |
grant_type=refresh_token&refresh_token={refresh_token}{
"access_token": "Sowof7oz47eWiRfYObIDMjZ0DiWatmIxJA3ckE3qTNQ",
"refresh_token": "RQKtU0W-a9d1Y94oJKyQbZWkewA1NBRjsq1-KsMbxAo",
"scope": "device",
"token_type": "Bearer",
"expires_in": 3600
}About token expiration
Since the refresh token expires in 30 days, printing from the app will become unavailable. Please refresh the device token to re-obtain a new refresh token. If the refresh token has expired, the user will need to log in to Epson Connect again in 4. 1. Device Authentication and select the device to be linke with. Please inform the user of this.
About unsubscribes
Please provide a method for users to unsubscribe from your app. When a user unsubscribes, please invalidate the access token in your app.
When using an API that does not involve access to a device, app authentication is performed instead of device authentication.
*Since an app is not required for implementing this test app, you can skip this section.
Call the token endpoint to obtain the refresh token and app token as follows.
When making an API call, you will need the Client ID and Client Secret obtained in 3. App Creation.
POST
https://auth.epsonconnect.com/auth/tokenHeader Name |
value |
|---|---|
Authorization |
Basic format authentication information (Client ID: Client secret) |
Content-Type |
application/x-www-form-urlencoded |
grant_type=client_credentials&scope=device{
"access_token": "pdTmBjYCyEdjqyS0lQnOIn53yJbn2iNj5o63MeTMzQY",
"scope": "device",
"token_type": "Bearer",
"expires_in": 3600
}By using the acquired app token, you will be able to call APIs that do not require access to the device.
GET
https://api.epsonconnect.com/api/2/printing/settings/notificationHeader Name |
value |
|---|---|
Authorization |
Bearer format app token |
x-api-key |
API key issued in 3. App Creation |
none{
"notification": true,
"callbackUri": "value"
}The app token will expire after 1 hour (3600 seconds) and will no longer be usable. In that case, call the token endpoint to re-obtain a new app token.
Here we will briefly explain the process of specifying a specific printer and printing a PDF file.
You can print in four steps:
(1) Printing ability acquisition
(3) File upload
(4) Print execution
First, check what kind of printing your printer can do via the API. The printing capabilities differ for photos and documents like PDFs. Here, we assume document printing and specify printMode as document. Use the device token obtained in 4. 1. Device Authentication to call the API as follows.
GET
https://api.epsonconnect.com/api/2/printing/capability/{printMode}Item Name |
value |
|---|---|
printMode |
Print mode (document or photo) |
Header Name |
value |
|---|---|
Authorization |
Bearer format device token |
x-api-key |
API key issued in 3. App Creation |
none{
"colorModes": [
"color",
"mono"
],
"resolutions": [
360,
720
],
"paperSizes": [
{
"paperSize": "ps_a4",
"paperTypes": [
{
"paperType": "pt_plainpaper",
"borderless": false,
"paperSources": [
"rear"
],
"printQualities": [
"draft",
"normal"
],
"doubleSided": false
},
...
]
},
...
]
}Next, let's create a print job. Use the device token obtained in 4. 1. Device Authentication to call the API as follows.
Here, we will print one document in color on one side of A4 size plain paper.
POST
https://api.epsonconnect.com/api/2/printing/jobsHeader Name |
value |
|---|---|
Authorization |
Bearer format device token |
x-api-key |
API key issued in 3. App Creation |
{
    "jobName": "JobName01",      #Please feel free to set the JobName using half-width alphanumeric characters.
    "printMode": "document",
    "printSettings": {
        "paperSize": "ps_a4",
        "paperType": "pt_plainpaper",
        "borderless": false,
        "printQuality": "normal",
        "paperSource": "rear",
        "colorMode": "color",
        "copies": 1
    }
}{
"jobId": "1234567", #The job ID issued by the system.
"uploadUri": "value" #URI to upload the file to be used in the next step
}Next, upload the file to be printed. Use the uploadUri parameter in the response body received when creating the print job in the previous section to call the API as follows.
POST
<uploadUri>&File=1.pdfItem Name |
value |
|---|---|
uploadUri |
Upload URI Replace the uploadUri in the print job response. |
File |
File name: 1.(extension) For PDF, set 1.pdf |
Header Name |
value |
|---|---|
Content-Type |
application/pdf |
1.pdf binarynoneOnce the file upload is complete, start printing. Use the jobId parameter in the response body received when creating the print job in the previous section. Call the API as follows using the device token obtained in 4. 1. Device Authentication.
POST
https://api.epsonconnect.com/api/2/printing/jobs/{jobId}/printItem Name |
value |
|---|---|
jobId |
jobId from the response of the print job creation API |
Header Name |
value |
|---|---|
Authorization |
Bearer format device token |
x-api-key |
API key issued in 3. App Creation |
none{}Now let's try running the completed app from a user's perspective.
First, try accessing the device authentication URL that you placed in your app. When you access the device authentication URL, the Epson Connect login screen will open. Enter your Epson Connect registered ID and password to log in.
When the list of Epson Connect registered printers linked to your account is displayed, select the printer you want to control via API.

Once you have selected the printer, make sure that you are redirected to the screen of your app that you set as the redirect destination in 3. App Creation.
Execute a print action from your app. If the contents of 4. 3. Print flow implementation have been implemented correctly, printing should begin on the printer you specified in 5. 1. Authorizing access to devices. If printing is successful, all API tests are complete. From here, you can improve the implemented program or use other APIs to further enhance the UX and functionality of your app.
